
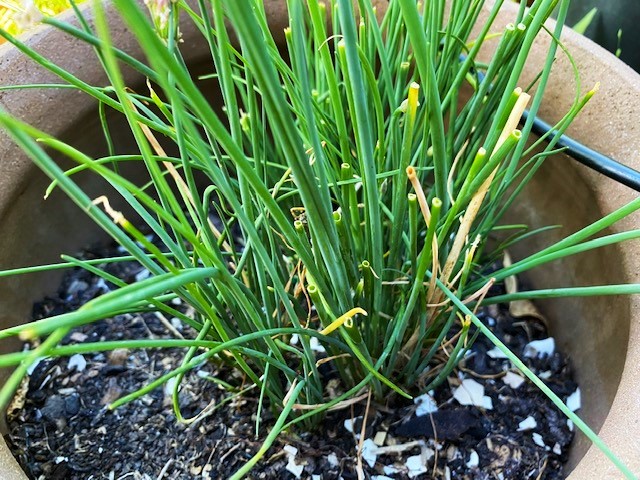
Chives are a tasty herb for garnishing baked potatoes, soups and omelets, but growing them at home isn’t without its challenges. If you have a chive plant that is turning yellow and dying, like me, you’re going to what to know why. Read on to find out why your chives are dying and how to fix the problem.
Why Are My Chives Dying?
The most common reason for chives dying is caused by temperature, transplanting, botrytis blight, thrips, underwatering, or poor quality seeds.
Let’s take a closer look at the reasons that cause your chive plants (Allium schoenoprasum) to die, and solutions to these problems so you can have a delicious harvest of chives.
1. Temperature
Prolonged exposure to heat or cold will cause your chives to turn brown and die. Chives grow best in moderate to warmer climates of temperatures between 60-85°F (15-30°C).
However, growing your own chives in warmer climates can be tricky. If your plants are exposed to temperatures that are too high, it will cause them to wilt and droop. If you plan on growing chives in an environment where temperatures are known to go beyond the maximum 85℉ (30°C) mark, it’s important to provide shade for your plants.
I use shade cloth in my garden as it is a great way to provide your plants, including chives, a reprieve from the scorching sun.
The color of your shade cloth will determine whether it reflects light or absorbs it. Dark colors (which I recommend choosing) such as navy blue, brown or black will absorb the sun’s powerful UV rays, creating a cooler growing area.
2. Transplanting
Transplanting chives from one area of your garden to another can cause them to experience transplant shock. The leaves of your chives may begin to wilt, turn yellow or die as a consequence of this stress.
Chives are usually hardy plants and often make a fast recovery after being transplanted. However, if your chives are struggling to shrug off their yellowness after having been transplanted, it means they haven’t been able to adapt to their new growing conditions.
When transplanting chives, the soil temperature should ideally be between 60℉ – 70℉ (15-21 °C). Transplanting chives should be done at the correct time of year, that is, when there is no probability of frost or cold weather.
Chives should be over 6-8 weeks old before they’re transplanted into your garden. If chives are transplanted too young, they are less likely to survive this stressful process.
When I transplant my chive seedlings from their seed tray into the soil, I’ve found that watering them in with a gentle seaweed solution like this one, helps seedlings better deal with transplanting shock.
Extra care should be taken when transplanting chive seedlings; always ensure the new soil is moist and try not to damage any of their delicate roots or stalks.
3. Botrytis Blight
Botrytis blight, or gray mold, is one of the most common fungal diseases affecting chives and garlic. Brown spots that appear on the leaves of a chive plant are the first indication that the plant is infected with this disease. The brown spots will eventually turn gray and the fungus’ spores will be released when the plant is touched.
Botrytis blight is caused by Botrytis cinerea, a fungus that thrives in high-humidity conditions. For this reason, overwatering your chives is one of the leading causes of this fungal infection. It’s best to only water your chives one to two times a week as this allows the soil to dry out before being rehydrated.
Any plants that are infected with this fungal disease must be removed from your garden immediately so as to avoid infecting other plants.
4. Thrips
Thrips appear as tiny black dots (approximately 1 mm in size) on the leaves of your chives. These insects suck the sap from the chive’s leaves which prevents the plant from growing properly.
It’s often hard to tell with the naked eye whether or not your chives have a thrip infestation. This is due to the minuscule size of these insects.
The easiest way to determine if your plants have thrips is to shake your chives over a white sheet of paper. If you notice a cluster of tiny black dots fall onto the paper, your chives are infested with thrips. Another telltale sign that your chives are infested with thrips is a severe discoloration of the chives’ leaves.
Thrips can be prevented from attacking your chives by placing sticky traps around the base of your chive plants, as well as around the perimeter of your garden. If you have a severe thrip infestation, you will need to use an organic insecticide to eliminate them. I recommend using Neem Oil which is what I use on my own chives and safe for organic gardening.
5. Underwatering

Droopy dying leaves on a chive plant may be caused by a lack of watering. If your soil is dry and you have not been watering your chives often enough, underwatering will be the obvious cause for your chive plants’ death.
Drier, warmer climates in which chives are exposed to direct sunlight for extended periods of the day, require more frequent watering in order to hydrate the soil.
If you’re experiencing a problem with your soil becoming dry too quickly, you may have planted your chives in soil that has poor water retention. You can increase the water retention abilities of your soil by adding organic matter such as compost.
After a warm day, check the moisture levels in your soil by sticking your finger i the soil just below the surface of the soil in order to gauge the moisture levels. If the soil is dry, give your thirsty chive plants a refreshing drink of water.
6. Poor Quality Seeds
Similarly to how chive plants can develop fungal infections, so can your chive seeds. When chive seeds are exposed to warm, damp conditions they may begin to harbor and spawn different types of fungi. Fungal-infected chive seeds will produce weak, underdeveloped chive plants.
Storing your seeds in a dry, dark place that is far from any moisture, will prevent them from becoming infected with disease.
I like to use a seed storage box with dividers. I’m able to store different types of seeds in one container and prevent my seeds from being exposed to any moisture.
Further reading: