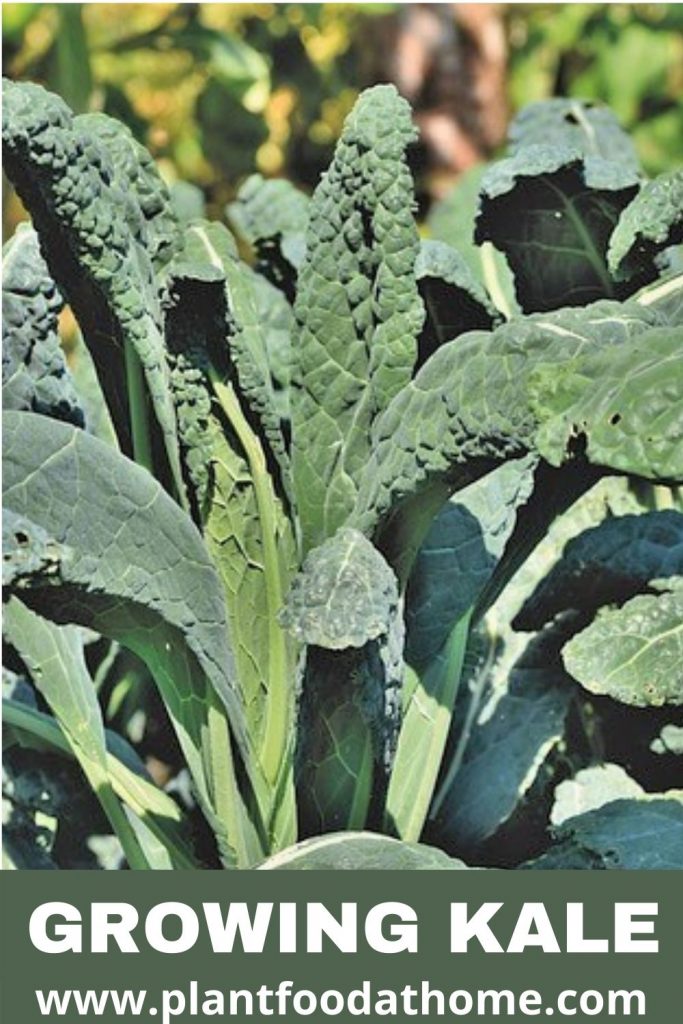
Growing kale is easy and one of the most versatile greens in the vegetable garden. This cold-hardy plant is packed with minerals and vitamins A and C. And with many varieties to choose from, anyone can have a beautiful bounty of kale in their garden. So let’s find out how to grow kale with this easy guide providing details on planting, caring, and harvesting kale at home.
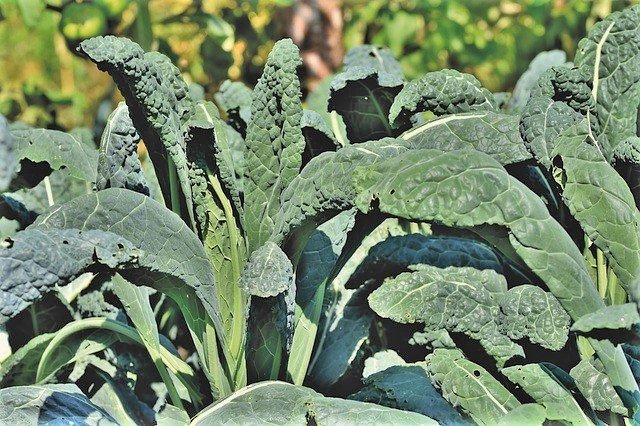
Table of Contents
Kale Plant Profile
Kale is classified as either an annual or a biennial, depending on the variety. An annual plant is a plant whose lifecycle lasts for only one growing season, and must be replanted annually (hence its name). When a plant is biennial, it takes two years to complete its lifecycle, rather than the one-year that annual plants live for.
Kale is a part of the brassica family, its botanical name being brassica oleracea. Other commonly known brassicas in this group include broccoli, cabbage, and Brussels sprouts.
Like many other brassicas, kale loves cool weather. In fact, most varieties of kale taste best when they’ve been exposed to cold temperatures and some can even withstand the frost all throughout the winter.
Thanks to its many varieties, it’s easy to find a type of kale to suit the needs of all gardeners.
Kale can be grown in-ground, in raised beds, and in containers. And that’s because kale can grow from as small as 1 foot (30cm), to as large as 3 feet (90cm) in height and width. There is also a variety of tree kale that grows to a whopping 6.5 feet (2 meters)!
As well as the many shades of green, kale also grows in beautiful shades of red, pink, and purple as well.
Quick Guide to Planting Kale
Plant According to Your Frost Schedule
As a cool-season crop, kale is usually planted in early spring, when the soil is workable, or in the late summer, early fall around 6-8 weeks before any frost is expected. This will help them establish themselves in the garden before the really cold weather.
Amend Soil if Necessary
If you’re unsure whether your soil is up to par, it might be a good idea to run a soil test to see what pH level your soil is at. You can do that with a soil monitor here. Kale prefers a pH of 6.0 and 7.0. If your soil is a little too acidic, add lime to raise the pH. If your soil is too alkaline, soil sulfur will lower the pH.
In addition to adjusting the pH, it is also important to enrich the soil with compost and fertilizer or aged manure, the kale plant thrives off of nitrogen to grow healthy foliage.
Choose an Optimal Spot for Planting
Kale requires full sun, so select a location in your garden where your kale will comfortably receive around 6 to 8 hours of sunlight a day. Space the transplants about 18-24 inches (45-60cm) apart.
Water Thoroughly and Follow up With Fertilizer
Kale needs to be watered well to maintain its health. Aim for between 1 and 1.5 inches of water each week. In addition, nourishing your kale with an organic fertilizer will assist your plant to thrive.
Clip off any Yellow or Damaged Leaves
Disposal of leaves that are dead or damaged aids in ensuring the longevity of your kale. Properly maintaining your plant by removing unwanted leaves will give you a more fortified kale plant in the future.
Related: Why Are My Kale Seedlings Turning Yellow? Causes and Solutions
Ideal Growing Conditions for Kale
Climate for Growing Kale
As a cold-hardy crop, kale thrives best in colder temperatures and is generally grown in early spring and late summer or early fall. Cool temps not only affect the growth of the plant but the taste as well. Kale tastes better when the leaves mature in cold temperatures. The air temperature range for growing kale is between 55-75°F (13-24°C), with the ideal range being 60-70°F (15-21°C).
Aim to plant out your kale when you can work the soil in early spring or in fall around 6-8 weeks before the first expected frost date.
Soil for Growing Kale
The best soil for growing kale is light, well-draining soil that is rich in nitrogen and organic material. Amend soil with compost and aged manure prior to planting to ensure the soil is fertile and healthy. A soil temperature of 60-65°F (15-18°C) is ideal, though once established, Kale can withstand much lower temperatures..
The soil pH level for growing kale is ideally between 6.0 and 7.0, which aids in the prevention of clubroot disease. However, kale can be tolerable of alkaline pH levels reaching as high as 7.5 and acidic pH levels as low as 5.5.
Sun Requirements for Growing Kale
Kale thrives in full sun, so it’s recommended to aim for about 6 to 8 hours of sunlight a day. Despite its preference for full sun, kale is still tolerant of partial shade as well.
Water Requirements for Kale
Ensuring your kale is properly hydrated is an integral part of its growth and health. Kale plants should be watered well. Aim for 1 to 1.5 inches of water every week.
Fertilizer for Kale Plants
Kale plants thrive in the rich fertile soil. Apart from adding compost and well-rotted manure at the time of planting, you can fertilize with an organic fertilizer to help your kale thrive. As your kale grows, you can follow up with fertilizer or top dress the soil with a mixture of compost and aged manure.
Kale plants also benefit from mulching with an organic mulch which will suppress weeds, help protect the soil and provide additional nutrients to the soil as it breaks down.
Growing Kale from Seed
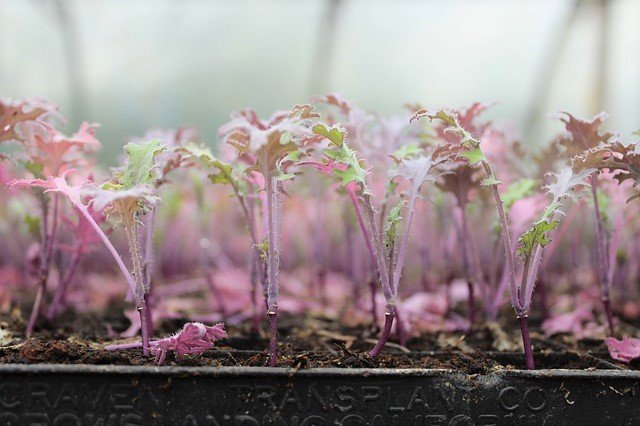
When you begin to grow kale from seed, you can either do so by sowing seed directly in the garden or you can sow them into small pots or trays to later transplant.
Sow 3-4 seeds roughly 1/4 inch (6mm) deep into each planting hole or pot. The soil you plant into should be light, well-draining, and enriched with compost and aged manure. Or use an organic seed-raising mix if you are sowing kale seed into pots or trays.
Water the seeds in gently and keep them moist but not soggy. Seeds will germinate in 7-10 days.
Once seedlings have 2 sets of true leave, you can begin thinning out the seedlings to the strongest plants. The thinned seedlings can be transplanted elsewhere if you like.
In the garden, you’ll want to aim for about 8-12 inches (20-30cm) of space between each seedling. And later 18-24 inches (45-60cm) between plants as they mature, depending on the variety.
Water the plants well and continue to do so to maintain the plant’s health.
Harvesting and Storing Kale
Kale is ready to harvest when the leaves are 4-5 inches (10-15 cm) depending on the variety. Though kale can also be grown and harvested as microgreens, so they are able to be eaten at any stage. And some varieties of kale can continue to grow much larger leaves for 12 inches (30cm). It’s best to start harvesting the oldest kale leaves first, starting from the lowest outside section. While harvesting kale, this is also a perfect opportunity to clip off and discard any yellow or damaged leaves.
Kale can be harvested as needed. Simply use garden clippers to harvest the lower, oldest leaves and the remaining leaves will continue to grow and provide further harvests for you in the future.
Always leave at least 3-4 kale leaves attached to the top of the plant (otherwise known as a growing crown, or the terminal bud). Removing all the leave or damage to the growing crown can be detrimental to future leaf production and subsequently, the longevity of your kale.
To store harvested kale, you should first wash the leaves thoroughly. After that, you can store the leaves loosely in a plastic bag in the refrigerator. They should stay fresh for about one week.
Kale can also be frozen for a much longer storage time. I have an article all about how to freeze kale here.
And if you’re looking for recipe ideas using kale why not try the below:
Almond Pesto Recipe (With Leafy Green Vegetables)
Brown Rice, Kale, Beet and Feta Salad Recipe
Or try kale chips below!
Easy Kale Chips Recipe
A really quick and delicious way of eating your kale harvest is to make kale chips in the oven. They are really simple to make and kids just love them, even if normally they are not too keen on this leafy green veg.
To make kale chips, start by preheating your oven to 350F (about 180C). Clean the kale leaves, pat them dry and tear them into rough 2 inch (5cm) pieces. Line a baking tray with parchment paper (baking paper) and pop the kale pieces on. Sprinkle them with a drizzle of oilve oil and some salt. Bake for 10 minutes and you’ll have tasty kale chips!
Kale Varieties
Although there are many variations, they are primarily derived from 4 varieties of kale. They are:
Vates Dwarf Blue Curled Scotch Kale
A classic choice for kale growers, the Vates variety of kale grows gorgeous curled green leaves that are a tasty and nutritious part of any meal. This variety grows between 12-16 inches (30-40cm), and produces tightly-packed leaves. Great cooked or raw, the Vates kale truly is the “everyman” of the kale world.
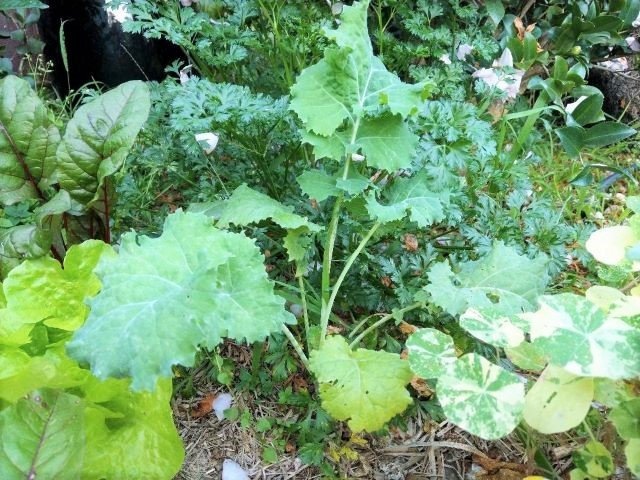
Dwarf Siberian Kale
Attractive blue and green feathery leaves, the Siberian Kale is one of the most cold-hardy available. It can grow in temperatures down to 14°F (-10°C). And Siberian kale grows 18-35 inches (45-90cm) tall.
I’m currently growing Premier Kale which is a strain of Siberian kale and pictured earlier in the article and below. This kale grows really easily in my garden. In fact, I’ve left it to flower a few times and now self-seeds on its own, giving me beautiful kale plants again and again.
Red Russian Kale
Beautiful and delectable, Red Russian kale is identifiable by its massive muted-green leaves and vibrant purple stems. Red Russian kale grows a bit larger than most varieties, sometimes reaching 3 feet long. This variety of kale can be left outside all winter. And don’t worry about the frost- these leaves taste particularly delicious after the frost sets in!
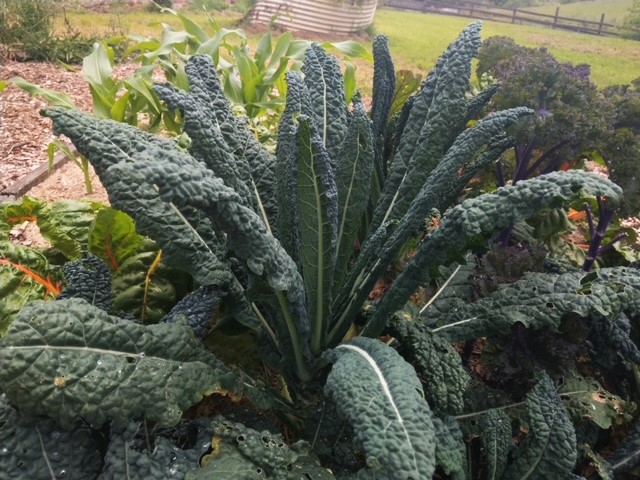
Lacinato Kale
Also known as Tuscan kale and Dinosaur kale, this Italian kale is identifiable by its gorgeous crinkled blue-green leaves. This plant grows upright, reaching between 2-3 feet (60-90cm) tall. These leaves have a sweeter and milder kale flavor, which is enhanced by colder weather. Try it sliced into thin ribbons and stirred into an Italian minestrone soup!
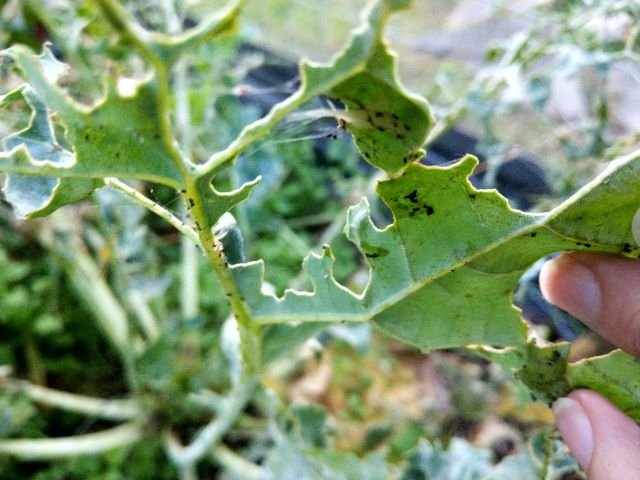
Kale Pests and Disease
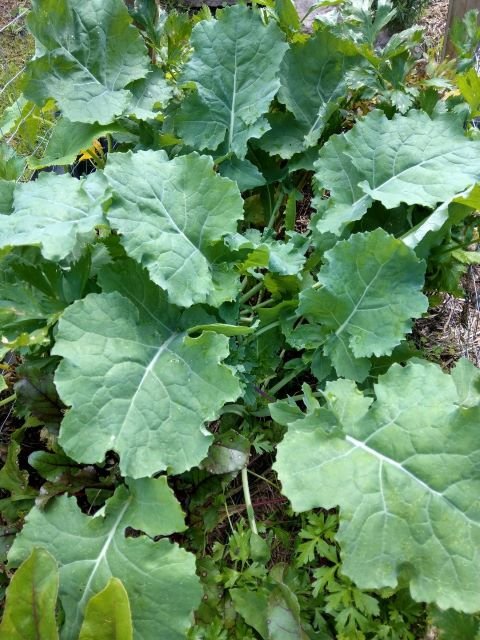
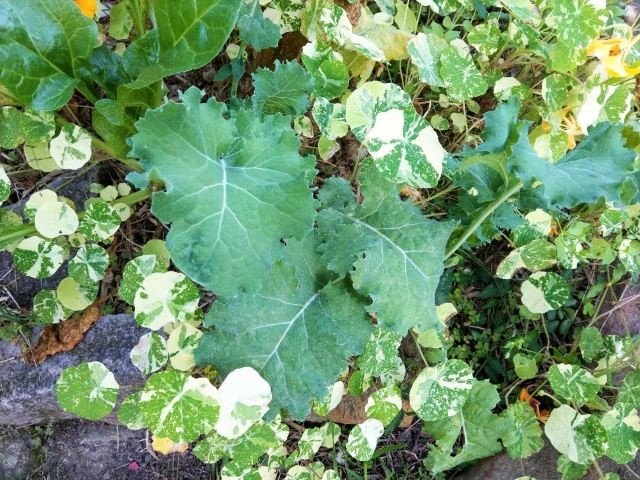
Before we look at some of the common pests and diseases that can affect kale, let me show you a photo below of one of my kale plants decimated by pests.
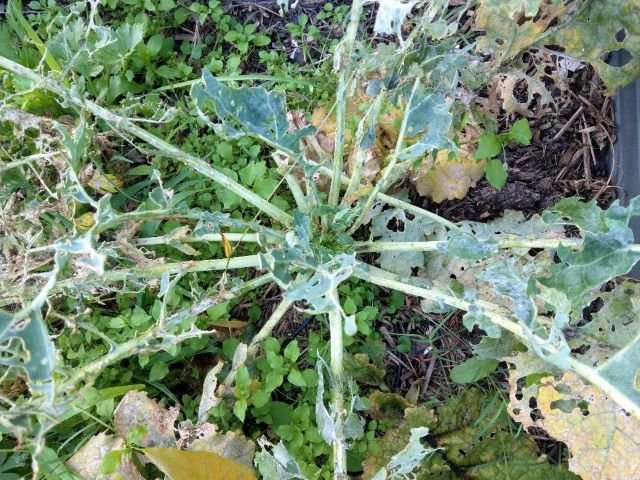
As you can see, it’s been completely eaten! This is the result of cabbage worms but before this attack, I had an excellent full season harvest of kale from this plant.
It’s worth knowing that when a plant reaches the end of its growing season, it’s far more susceptible to attack by pests and disease. In this case, the simplest thing to do is to discard the plant. Here I was able to compost the kale plant but in some disease-based attacks, the plant should be destroyed to avoid cross-contamination.
So let’s find out a few pests and diseases you might come across when growing kale and how you can solve them.
Related: 6 Causes Of Dying Kale (And How To Fix It!)
Kale Pests
Cabbage Worms
As the name implies, cabbage worms are tiny green caterpillars that target brassica family members. While cabbage worms may not be a threat to larger, established plants, they are a force to be reckoned with if they attack your seedlings.
Cabbage worms eventually grow into cabbage white butterflies. And while they might look attractive, the butterflies can lay microscopic eggs that might go unnoticeable until it’s too late. They often feed on the base of your plants, often without being noticed. In addition, the fecal matter they leave behind can contaminate your crops.
It is important to inspect your plants for any signs of trouble. If you happen to see one of these worms, pick them off manually. A home remedy to exterminating cabbage worms is to dampen the leaves of your plant and sprinkle cornmeal. This causes swelling when the cabbage worms feed off of it.
Using horticultural neem oil can deter the cabbage white butterflies from laying eggs, however, it’s worth noting it will not get rid of the cabbage worms.
Flea Beetles
Flea beetles get their name from their ability to jump at signs of being threatened. Because of their elusiveness, it’s better to identify these shiny black beetles by their damage rather than looking for the beetle itself.
Flea beetles feed on the foliage and leave behind holes, often opting to target newer leaves rather than the old. The holes themselves don’t pose a danger to mature and established kale plants, but rather the biggest threat is the bacterial diseases that these beetles can carry jumping from plant to plant. Flea beetles can carry wilt and blight, both detrimental to plants. Because of this, gardeners should be aware of the flea beetle’s presence.
There are a few natural routes you can take to prevent the spread of flea beetles in your garden. First, a dusting of talcum power on the foliage of your plants can help repel flea beetles. In addition, flea beetles are particularly repulsed by catnip and basil. You might want to consider keeping a pot nearby any susceptible plants to trap flea beetles. Housing your kale in row covers is also helpful, though they would have to be completely sealed to keep the pests out.
Cabbage Aphids
Cabbage aphids are tiny little insects that feed off of plants’ nutrients by sucking the liquid right out of them. Despite being small in size, they’re detrimental to gardens. When inspecting your kale plants, do be sure to check in between leaves, because that’s where these nasty little buggers are likely to hide!
Thankfully, aphids are very much treatable with simple solutions. If you suspect your plants are under attack, dousing them with a stream of cold water is often enough to loosen the aphids off your plants. If that is not enough, they can also be treated with diatomaceous earth, which is a natural and organic powder made of the fossilized skeletons of aquatic organisms. You can even solve aphids with kitchen ingredients anyone has around the house, such as dusting the plants with flour (which causes them to constipate). Or using a solution of washing up liquid mixed with water and sprayed on to the plant.
Related: 8 Kale Pests (And How to Get Rid of Them!)
Kale Plant Diseases
Clubroot
An arch nemesis of the brassica family, clubroot is a damaging disease that you do not want your kale to catch. The cause of clubroot originates from the pathogen known as plasmodiophora brassicae.
You can identify a clubroot infection by inspecting your plants above ground. Stunted growth, wilting at the slightest bit of drought, and yellowing leaves are all symptoms that point towards clubroot. Below the surface, clubroot is identifiable by swollen and distorted roots. Early in the season, these roots appear white in color but rot and turn black by the end of the season.
Clubroot doesn’t have a quick-fix remedy. Once infected, there is a high likelihood the disease will linger long after the plant is gone. you won’t be able to replant brassicas in the affected location (however, plants of a different family are acceptable). The best course of action is to entirely remove all affected plants and surrounding weeds and destroy them. In addition, any gardening tools that came in contact should be properly cleaned and disinfected.
Powdery Mildew
Powdery mildew is a fungal disease that reduces the quality and productivity of your kale. This disease can spread simply by drifting off other plants from the wind. Powdery mildew is also unique in that it thrives in warmer, drier climates. Powdery mildew is identifiable by its circular white spots that look like the leaves were dusted with powder.
Luckily, powdery mildew can easily be treated with simple and natural solutions! This fungal disease can be curbed by spraying a fungicide on your plants to kill the fungus. I use a natural method when dealing with powdery mildew by dousing it with a homemade milk spray here.
Growing Kale FAQ’s
Should I let my kale plant flower?
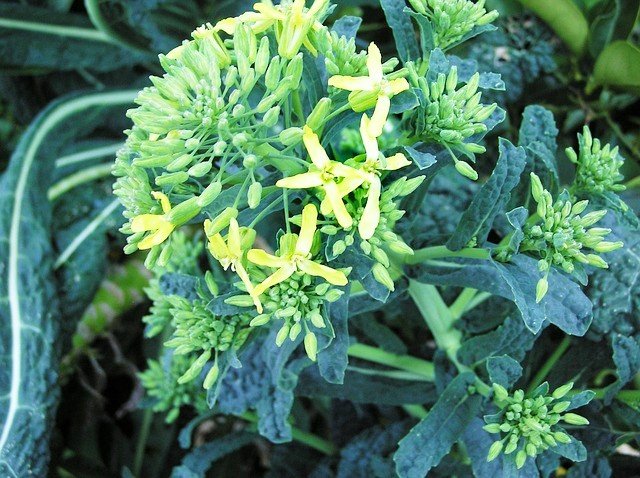
You can’t really stop a kale plant from flowering. If you nip the flower stem off, the plant will continue to produce new flowering stems along the side of the plant. But the good news is that you can eat the flowering stems along with the blooms, called kale florets, just like you would flowering broccoli.
Kale plants flower either because the weather warms up and causes them to bolt (produce flowers) or because they’ve reached the end of their growing cycle and flowering is nature’s way of producing the next crop.
Blooms provide food for bees and other pollinators and then become seeds you can either collect to plant again or leave them on the kale plant to self-seed in your garden if space allows.
I have kale self-seeding regularly and love seeing new kale plants pop up in the garden. They also grow in some unusual places such as in the lawn and between the pavement! Any new kale seedlings I find in unwanted places I simply transplant to my preferred position.
Conclusion
It’s easy to grow kale and once established, you will have a very healthy supply of green vegetables on hand for whenever you want them. It’s a delicious and highly nutritious leafy green vegetable with a variety to suit everyone’s needs. So which variety of kale will you grow?
Recommended Products
Further reading:
- How To Grow Swiss Chard For Fast Leafy Green Vegetables
- How To Grow Lettuce – Delicious Fast Growing Vegetable
- Why Is My Bok Choy Flowering? Causes and Solutions
- Eating Warrigal Greens: Cooking and Recipes Ideas
- Why Is My Spinach Flowering? Causes and Solutions
- Why Is My Spinach Bitter? Answered!